How to Create a Todo List with SwiftData
— iOS Development, Xcode, Swift, SwiftUI — 2 min read
In this tutorial, we'll explore how to create a to-do list app using SwiftData, a new lightweight and user-friendly data persistence library for Swift that takes a lot of the headache out of handling and storing data in iOS.
Prerequisites
Before we get started, please ensure that you have the following prerequisites installed:
- Xcode 15 or a newer version
- Your project will need to target iOS 17 or above to use SwiftData
Creating the Project
To create a new project, open Xcode and select "Create a new Xcode project" from the welcome screen. Choose "App" as the project template and click "Next."
Enter a name for your app, select a team, and choose a bundle identifier. Make sure to select "SwiftUI" as the user interface and "SwiftData" for storage and click "Next."(you can also host the data in iCloud but that's beyond the scope of this short tutorial!)
Choose a location to save your project, and then click "Create."
Adding SwiftData
To add SwiftData to your project, you can simply import the library. In Xcode, open your project and select the file where you want to use SwiftData. At the top of the file, add the following import statement:
1import SwiftDataThis will allow you to use SwiftData in your project.
Creating the Todo Item Model
In SwiftData, you define your data models as classes or structs that conform to the Model protocol. To create a to-do item model, create a new Swift file in your project and add the following code:
1import SwiftData2
3@Model4final class TodoItem {5 var title: String6 var completed: Bool7 var timestamp: Date8 9 init(10 title: String,11 completed: Bool,12 timestamp: Date13 ) {14 self.timestamp = timestamp15 self.title = title16 self.completed = completed17 }18}In this code, we define a TodoItem class that conforms to the Model protocol. The TodoItem class has three properties: title, completed, and timestamp. We also define an initializer that takes values for each of these properties.
Configuring the ModelContainer
Change your project's App to match the code below. You should already have most of it in the template, I think all you'll really need to change is the class inside the Schema list.
1import SwiftUI2import SwiftData3
4@main5struct TestBedApp: App {6 var sharedModelContainer: ModelContainer = {7 let schema = Schema([8 TodoItem.self,9 ])10 let modelConfiguration = ModelConfiguration(schema: schema, isStoredInMemoryOnly: false)11 do {12 let container = try ModelContainer(for: schema, configurations: [modelConfiguration])13 return container14 } catch {15 fatalError("Could not create ModelContainer: \(error)")16 }17 }()18
19 var body: some Scene {20 WindowGroup {21 ContentView()22 }23 .modelContainer(sharedModelContainer)24 }25}This code represents the entry point for your SwiftData-based app and sets up the ModelContainer for data management(along with the schema for TodoItem). Make sure to include this code in your project to ensure proper integration with SwiftData. You can also get rid of the Item class/file that was included in the original template.
Creating the Todo List View
Okay first off we're going to create a TodoView for our list, create a new Swift file called TodoView and add this:
1struct TodoView: View {2 var item: TodoItem3 4 var body: some View {5 HStack {6 VStack(alignment: .leading) {7 Text(item.title)8 .font(.title3)9 Text(item.timestamp, format: Date.FormatStyle.date)10 .font(.caption)11 }12 Spacer()13 14 Button {15 item.completed.toggle()16 } label: {17 Image(systemName: item.completed ? "checkmark.square.fill" : "square")18 .resizable()19 .frame(width: 20, height: 20)20 }21 }22 }23}The TodoView struct takes a TodoItem object as a parameter and displays its title and timestamp properties.
Next - to create the to-do list view - open the ContentView.swift file in your project and replace the existing code with the following:
1import SwiftUI2import SwiftData3
4struct ContentView: View {5 @Environment(\.modelContext) private var modelContext6 @Query(sort: \TodoItem.timestamp, order: .reverse) private var items: [TodoItem]7 @State private var showingAlert = false8 @State private var title = ""9
10 var body: some View {11 NavigationSplitView {12 List {13 ForEach(items) { item in14 TodoView(item: item)15 }16 .onDelete(perform: deleteItems)17 }18 .toolbar {19 ToolbarItem(placement: .navigationBarTrailing) {20 EditButton()21 }22 ToolbarItem {23 Button {24 showingAlert = true25 } label: {26 Label("Add Item", systemImage: "plus")27 }28 }29 }30 } detail: {31 Text("Select an item")32 }33 .alert("New Item", isPresented: $showingAlert) {34 TextField("Title...", text: $title)35 Button("OK") {36 addItem()37 }38 } message: {39 Text("Enter the title for your new to-do item")40 }41 }42
43 private func addItem() {44 withAnimation {45 let newItem = TodoItem(title: title, completed: false, timestamp: Date())46 modelContext.insert(newItem)47 title = ""48 }49 }50
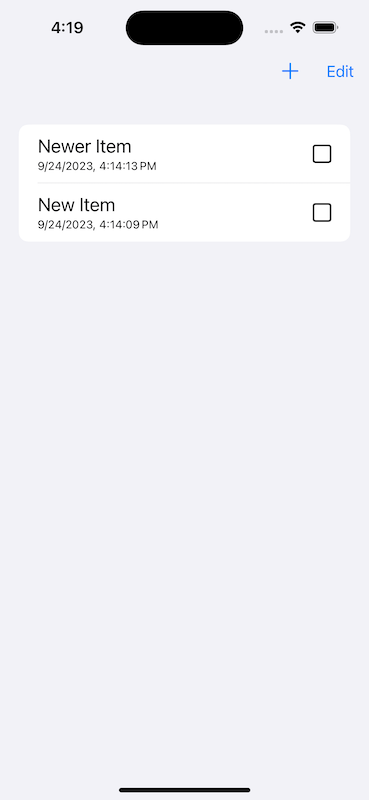
51 private func deleteItems(offsets: IndexSet) {52 withAnimation {53 for index in offsets {54 modelContext.delete(items[index])55 }56 }57 }58}In this code, we define a ContentView struct that displays a list of to-do items. We use the @Query property wrapper to fetch the to-do items from the model context and sort them by timestamp in reverse order(newest items will show first).
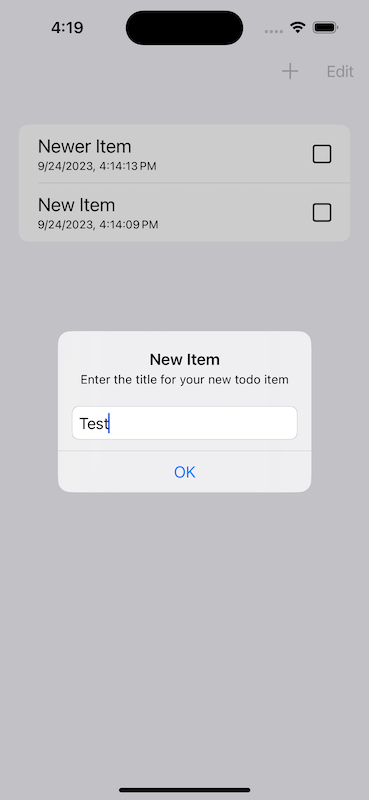
We use an alert modifier to display an alert with a text field when the user taps the "Add Item" button. The alert has a primary button that calls the addItem function when pressed. In the addItem function, we create a new TodoItem object with the title entered by the user, insert it into the model context, and reset title to an empty string so it can be used again.
All Done!
And there you have it! A really simple todo list created using SwiftData. I was surprised how easy it was to knock this all together - it only took me about 20 minutes or so to change the original template into this. Keep in mind SwiftData will also save any changes you make to items automatically. Also, here's a couple of screenshots of what the finished product will look like:

